
Step By Step Guide To Dental Implant
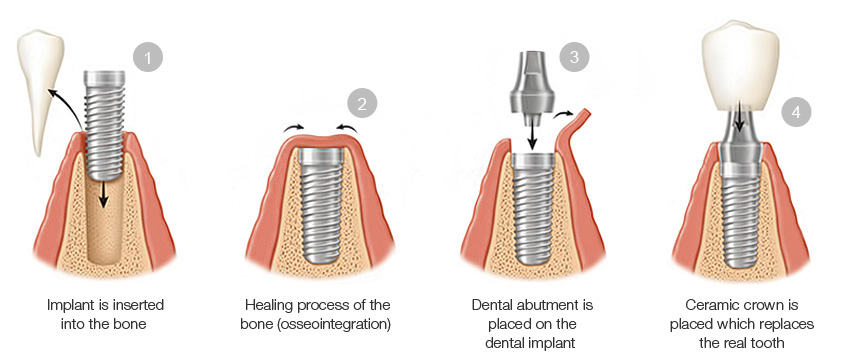
If you’ve got one or more of your teeth missing, dental implants can help you restore the aesthetic appeal and the function of your smile. A dental implant is a titanium post that a dentist inserts surgically beneath the gum line to serve as a foundation for a replacement tooth. Once the implants are well positioned, and the gums have had time to heal, the dentist can now insert permanent crown. Patients who have lost their teeth through various reasons like trauma to the face, periodontal diseases, or any other reasons can now benefit from this procedure. This procedure is considered as one of the most successful tooth replacement procedures since it closely replicates the look and function of a natural tooth. With proper care, dental implants can last a lifetime. While every dental implant procedure may differ based on the number of teeth missing and the location, here is the basic step by step guide to a dental implant.
Before The Procedure
Before the procedure, your dentist will carry out some few tests to verify if you are a viable candidate for dental implants. For a dental implant to be performed on a patient, his/her jaw bone requires to be strong. If a patient has lost a lot of jawbone, the dentist may require first to perform a bone graft procedure. Your dentist will assess your jaw bone and let you know if this process is necessary. During the initial visit, you will also receive information on what is required of you on the day of the dental implant procedure. If you are a smoker, it is highly recommended that you quit the habit several months before undergoing the procedure since it can cause poor Osseointegration. This is where there are poor bone and implant integration, which is one of the leading causes of dental implant failure.
Anaesthetic
Before the procedure, your oral surgeon or the dentist will start by making sure that you are numb and cannot feel any pain. You will remain awake during the procedure, but apart from some slight feeling of discomfort or pressure, you will not feel any pain. If you still cannot handle this, there is an option of a more heavily sedated approach that can completely knock you out or remain awake but generally unaware.
Preparing the Implant Site
Once you are numb and can’t feel any pain, your oral surgeon or dentist will now prepare the implant site. Your professional will open the gums so that he can access the jaw bone and make an evaluation of the implant site. The bone will be required to be relatively smooth and flat, if not the oral surgeon may use a drill to reshape it.
Drilling the Pilot Hole
The initial drill that is used when making the hole for a dental implant is referred to as pilot drill. Simply this is a small diameter drill bit that is used to create a hole, which serves as a guide for other drills used later on. The dentist may use a plastic jig when making the pilot drill. This is a device created using plaster casts of the patient’s mouth. When it is used, it is fitted into position, then the pilot drill is inserted through its opening that is centred over the implant site. The jig helps to centre and guide the drill’s orientation. Once the dentist is done with drilling the pilot hole, he will use an alignment pin to check its alignment.
Finishing the Hole
When the dentist is done with drilling the pilot hole, he will use some other larger drill bits until he attains the right diameter for the dental implant. The size of your dental implant is chosen before the procedure based on the condition of your bone. The dentist will then check the alignment again once he is done with the hole for the implant using the alignment pin. The hole will then be threaded using a screw tap so that it can match the threads on the implants.
Placing the Implants
Now you can finally receive the implants; there are two methods that the dentist can use. It can be done using a special head for dental drill or a small hand wrench. Sometimes it can be done using a small torque wrench. This can make you feel somehow uncomfortable, but trained oral surgeons will be able to minimise the discomfort. The site will then be closed using stitches and an implant cap.
The Healing Process
Just like it is in many surgical processes, the kind of care you provide on your dental implant during the healing process will at a great extent prove whether the procedure will be successful. The stitches will be removed after 7 to 10 days. The implant will be given a period of 3 to 6 months so that it can fuse with the bone (Osseointegration) before the crown is placed. During the healing process, maintain a healthy diet, keep the area exceptionally clean and don’t forget to keep up your dental check-ups.
Permanent Restoration
After the dental implant has undergone the healing process and its stable, now the dentist can place permanent restoration. This can be a dental crown, bridge or denture. The dentist will remove the implant cap and replace it with an abutment and place a dental prosthesis on top of it.
After The Procedure
A good number of patients are always happy and satisfied with the whole dental implant procedure. It is advisable that you stick to soft foods during the Osseointegration process. You will also receive advice from your dentist on when you can replace temporary parts of the dental implants with permanent. Patients who have undergone through this process say that the pain they experienced is just a slight one. After the process is done and the implant has completely healed, you can treat it just like your natural teeth.
Are You In Springvale or Its Surrounding Areas?
Springvale Dental Clinic has been serving Springvale and its surrounding areas for many years now. Our specialised care ensures that every patient receives the quality care they deserve. Dental Implants in Springvale has never been easier especially with the use of latest implant technology at Springvale Dental Clinic. Call us today or visit our clinic at Springvale to discuss your options.